
Understanding the Actor model to build non-blocking, high-throughput distributed systems
This is the fourth post in the system design series where I discuss the intricacies of designing distributed scalable systems and the related concepts. This will help you immensely with your software architecture and system design interview rounds, in addition to helping you become a better software engineer.
With that being said, let’s get started.
Imagine a scenario where on an e-commerce site, ‘n’ users are concurrently competing to buy a product limited in number. Multiple requests (in the form of multiple threads) would compete to purchase a certain product.
Here is a product purchase code snippet that’ll help us understand things better:
public void synchronized buyProduct(int productId, int count) throws NotEnoughInventoryException {
//Fetch, the current product count
int currentCount = productPurchaseService.getProductCount(productId);
//Check if the current count is less than the requested count
if (currentCount < count) {
//Throw a not enough inventory exception
throw new NotEnoughInventoryException("Not enough inventory for product " + productId + ". Current count: " + currentCount + ", requested: " + count);
} else {
productPurchaseService.performPurchase(productId, count);
//Once the purchase is successful. Update the product count
productPurchaseService.setProductCount(productId, currentCount - count);
}
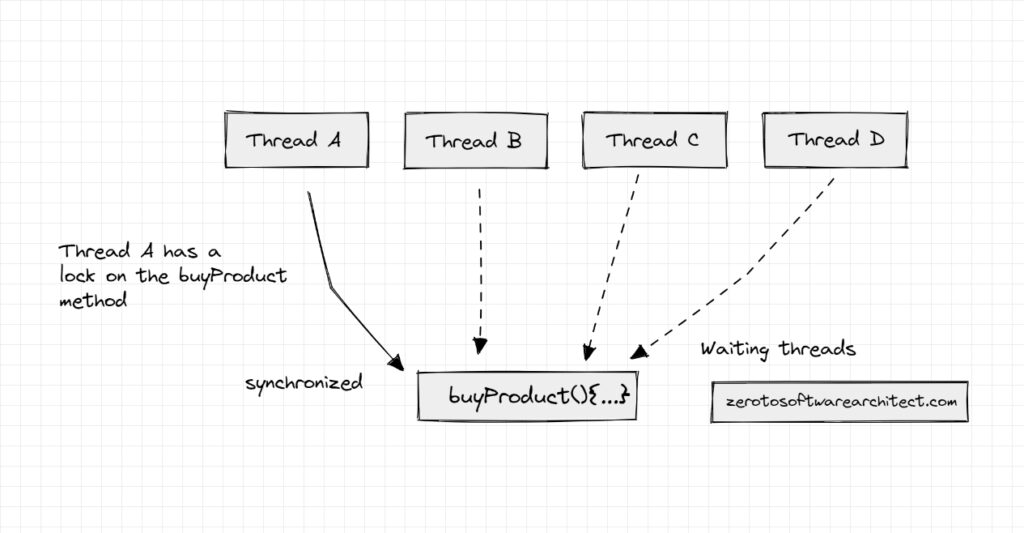
}The synchronized keyword ensures only one thread accesses the buyProduct method at a time while other threads wait for their chance. This ensures system consistency.
Without the synchronized keyword, concurrent threads will access the buyProduct method simultaneously, making things inconsistent. For instance, say we have the count of a certain product in the inventory as 5, threads A and B enter concurrently and see the product count as 5.
A purchases 3 products and decreases the count to 2, but when B tries to purchase 4 products, the transaction fails due to the NotEnoughInventoryException and leaves thread B user confused.
Though the synchronized keyword stops multiple threads from accessing the buyProduct method concurrently, it spawns a bottleneck in the system where quite a number of threads have to wait for their access to the method.
This serialized fashion of accessing a method can be costly, resulting in deadlocks and underutilization of modern multi-core machine resources. Also, locks would work well locally within a single JVM but what if our system is distributed with several JVMs?
To tackle this, if distributed locks come to your mind, let me tell you, they are overly complex to implement, limit scalability, and the application latency soars like a rocket. A good way to manage this scenario is by leveraging database transaction isolation levels.
Database transaction isolation levels are the I (Isolation) in the ACID. The database ensures that all the transactions are kept isolated from each other to maintain the system’s consistency.
Every ACID-compliant database offers different transaction isolation levels (with their respective implementation) that the developers can leverage to ensure their application behavior is as expected.
If you wish to delve into the details, understand how databases handle and scale with heavy concurrent traffic, how distributed transactions and large-scale real-world applications are designed and much more, check out my distributed systems design course here.
In this write-up, we discuss a non-blocking approach with the actor model to implement high throughput distributed systems dealing with concurrent traffic. The actor model is natively designed to work with multi-threaded applications on multi-core machines and distributed environments.
This model enables us to focus on our business logic as opposed to grappling with low-level stuff like threads, atomic variables, locks and such. It allows us to write high-performant, fault-tolerant code with reliable behavior.
Let’s understand what it is.
What is the Actor model?
The actor model is designed to be non-blocking and message-driven with high throughput in mind. The core processing unit in an actor model is an actor that can communicate with other actors in the system by the exchange of messages.
An actor can send messages to other actors. It can also create new actors (forming a hierarchy) and designate behavior that can be applied to the messages that are sent to the other actors. An actor is a container for state, behavior, child actors and a message queue aka mailbox.
Every actor in the system is isolated from each other, keeping their internal state private. The only way of communication is message passing that is queued in the receiver actor’s message queue. This model offers a way to write concurrent code that is scalable, resilient and lightweight than the thread-based approach.
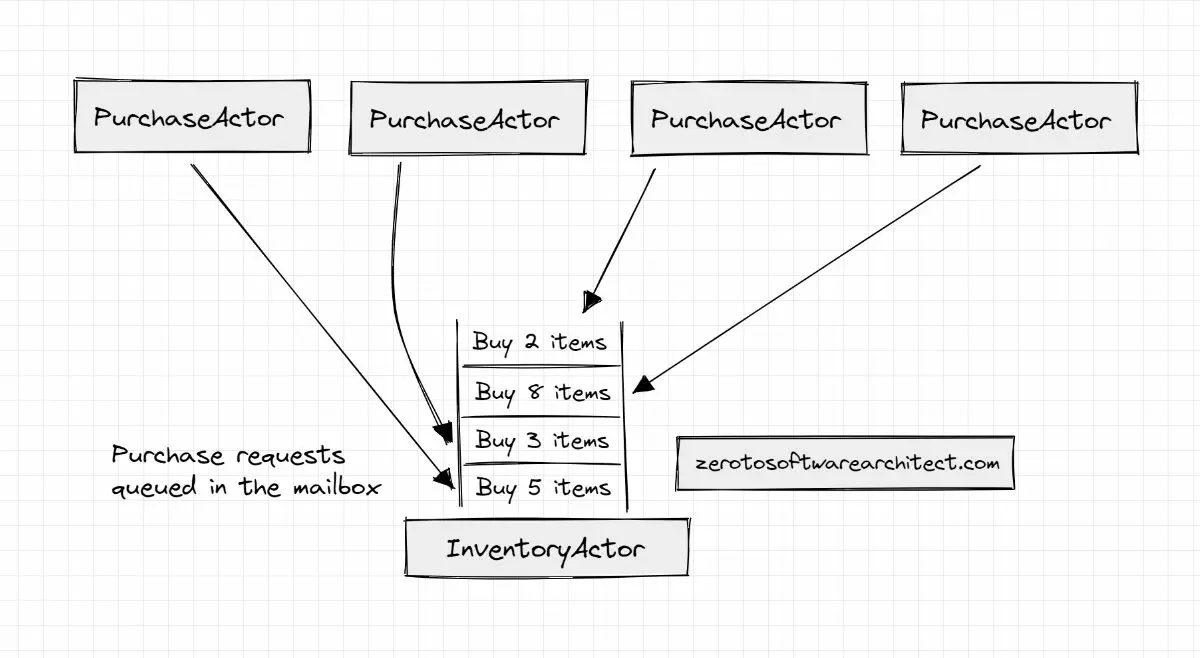
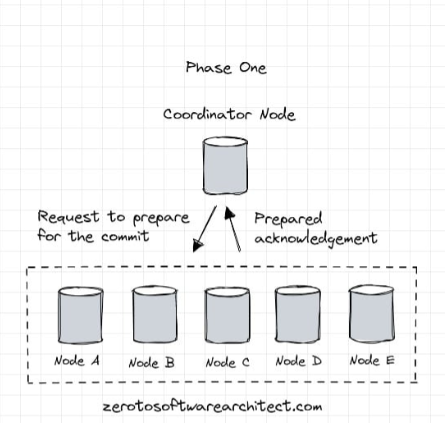
Coming back to our e-commerce site example. To implement the use case via the actor model, we will have a dedicated actor, ‘PurchaseActor,’ that will send the product purchase message requests to the ‘InventoryActor,’ which will handle the product purchase flow queuing all the requests in its mailbox.
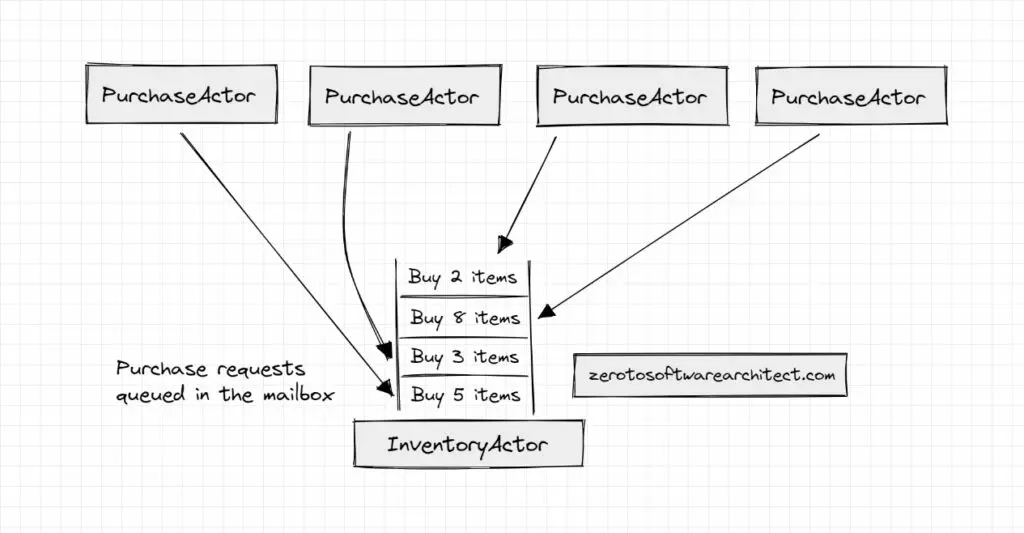
To buy a product, an instance of a PurchaseActor will send a message to the InventoryActor. The message will contain the product id and the product count. The InventoryActor will process the message via its queue and based on the order status (successful/failed), it will send a relevant message back to the ProductActor.
In this use case, no threads have to wait due to the synchronized keyword. Rather, all the purchase requests sent by several users/PurchaseActors are queued by the InventoryActor in its mailbox. The PurchaseActor threads are free to do the other work as their product purchase requests are processed.
Prominent backend languages have frameworks in their ecosystem that help us implement the actor model. For instance, for JVM-based languages like Java and Scala, we have Akka. For Python, we have Pykka and for Go, we have Gosiris.
The code snippet below, that I’ve written, with the Java Akka framework, helps us understand how we can implement our product purchase flow with the Akka framework in a non-blocking fashion.
//Actor that receives the product purchase message requests
class InventoryActor extends AbstractActor {

  private ProductPurchaseService productPurchaseService;

  public InventoryActor(ProductPurchaseService productPurchaseService) {
    this.productPurchaseService = productPurchaseService;
  }

//createReceive is an overridden Akka method that helps set the behavior of an actor
  @Override
  public Receive createReceive() {
    return receiveBuilder()
        .match(BuyProduct.class, this::handleBuyProduct)
        .build();
  }

  private void handleBuyProduct(BuyProduct buyProduct) {
    int productId = buyProduct.productId;
    int count = buyProduct.count;
    int currentCount = productPurchaseService.getProductCount(productId);

    if (currentCount < count) {
      sender().tell(new NotEnoughInventoryException(
          "Not enough inventory for product " + productId + ". Current count: " + currentCount + ", requested: " + count), self());
    } else {
      productPurchaseService.performPurchase(productId, count);
      productPurchaseService.setProductCount(productId, currentCount - count);
      sender().tell(new PurchaseSuccessful(), self());
    }
  }
}

//Actor that will send purchase requests to the InventoryActor
class PurchaseActor extends AbstractActor {

  private final ActorRef inventoryActor;

  public PurchaseActor(ActorRef inventoryActor) {
    this.inventoryActor = inventoryActor;
  }

  @Override
  public Receive createReceive() {
    return receiveBuilder()
        .match(RequestPurchase.class, this::handleRequestPurchase)
        .build();
  }

  private void handleRequestPurchase(RequestPurchase requestPurchase) {
    int productId = requestPurchase.productId;
    int count = requestPurchase.count;
    inventoryActor.tell(new BuyProduct(productId, count), self());
 }
}

public class BuyProduct {

  public final int productId;
  public final int count;

  public BuyProduct(int productId, int count) {
    this.productId = productId;
    this.count = count;
  }
}

public class RequestPurchase {

  public final int productId;
  public final int count;

  public RequestPurchase(int productId, int count) {
    this.productId = productId;
    this.count = count;
  }
}

public class PurchaseSuccessful { }
We will create two actors in the system the InventoryActor and the PurchaseActor. As the names imply, InventoryActor takes care of the product purchase flow and the PurchaseActor, which will have multiple instances, will send the product purchase request message to the InventoryActor.
Our product purchase code, stated at the start of this blog post, goes into the handleBuyProduct method in the InventoryActor class. The InventoryActor will send a NotEnoughInventoryException message back to the sender if there is insufficient inventory or a PurchaseSuccessful message if the purchase succeeds.
The two actors communicate with each other by sending messages, which allows them to function independently of each other in a non-blocking fashion.
The BuyProduct and RequestPurchase classes are created to package the data shared between the InventoryActor and the PurchaseActor. In our case, it will be the productId and the product count being purchased.
The PurchaseActor uses the BuyProduct class to send a purchase request to the InventoryActor. The InventoryActor receives the BuyProduct message and uses the productId and count arguments to check the inventory and execute the purchase request.
The RequestPurchase class will be used by the client (main method) to simulate a purchase request.
The PurchaseSuccessful class is created to notify the PurchaseActor of the successful purchase. We can also do without this class but having a separate class helps us add additional functionality like logging a purchase successful message, notifying different entities in the system, sending an update to the UI and so on on a successful product purchase.
The idea behind creating specific classes is to define their role clearly in the product purchase flow. We can add additional functionality in these classes avoiding tight code coupling.
How will the PurchaseActor send a message to InventoryActor?
This is framework specific. You can visit the Akka documentation to delve into the details. However, I’ll quickly give an insight into the methods used in the code above.
The PurchaseActor will send a message to the InventoryActor using the tell method. The method sends a message to an actor and continues processing without waiting for a response in a non-blocking fashion.
The createReceive method defines the actor’s behavior when it receives several message requests. In the PurchaseActor class, the createReceive method specifies how the actor will behave when it receives a RequestPurchase message, i.e., triggering the handleRequestPurchase method and sending a product purchase message request to the InventoryActor.
The InventoryActor will queue all the requests from several PurchaseActors in its mailbox. So, as opposed to threads being blocked waiting for their turn to access a synchronized block, they work in a non-blocking way consuming starkly fewer resources and increasing throughput. Also, we do not have to get our hands dirty writing low-level multi-threading code and can focus more on implementing business logic.
Simulating the client
If we simulate a client for the code above, it will be something like:
public static void main(String[] args) {

    ActorSystem system = ActorSystem.create("ProductPurchaseActorSystem");

    ActorRef inventoryActor = system.actorOf(Props.create(InventoryActor.class), "InventoryActor");
    ActorRef purchaseActor = system.actorOf(Props.create(PurchaseActor.class, inventoryActor), "PurchaseActor");

    //Simulate a purchase request for product ID 3472, count 5
    purchaseActor.tell(new RequestPurchase(3472, 5), ActorRef.noSender());

    // Wait for the purchase to complete before shutting down the system
    try {
        Await.result(system.whenTerminated(), Duration.Inf());
    } catch (InterruptedException e) {
       logger.info("purchase successful");
    }
  }
In the code above, an ActorSystem is created with the name “ProductPurchaseActorSystem.” The ActorSystem acts as a container of actors managing shared facilities like scheduling services, configuration, logging, etc.
Once the ActorSystem is ready, ActorRef (actor references) are created for the InventoryActor and the PurchaseActor. The PurchaseActor sends a message request to the InventoryActor for the purchase with the RequestPurchase object as an argument.
The idea behind providing code in this article is to help you understand the flow of the Actor model at a very high level. A real-world code implementation will naturally vary based on the framework used and the business requirements.
Well, this is pretty much it. If you liked the content, I request you share it with your network. In the next blog post, which is a continuation of this, I have discussed how the Actor model/actors are run in clusters enabling us to write high-performant, high throughput, distributed systems.
I am Shivang. You can read about me here.
Check out the Zero to Software Architecture Proficiency learning path, a series of three courses I have written intending to educate you, step by step, on the domain of software architecture and distributed system design. The learning path takes you right from having no knowledge in it to making you a pro in designing large-scale distributed systems like YouTube, Netflix, Hotstar, and more.
Follow Me On Social Media